
標題: eGroupware 安裝步驟 [打印本頁]
作者: danny 時間: 2007-8-19 12:47 標題: eGroupware 安裝步驟
適用於 Red Hat家族 ( 含Fedora Core、RHEL、CentOS )
關閉防火牆 iptables 及 selinux 安全設定並且重開機讓新的設定生效複製內容到剪貼板
代碼:
[root@sample ~]# chkconfig iptables off

[root@sample ~]# vi /etc/selinux/config

將SELINUX=enforcing 改成  SELINUX=disabled

[root@sample ~]# init 6設定新的防火牆設定(這部份可以參照老師說明的方式或參照本人的範本)複製內容到剪貼板
代碼:
[root@sample ~]# vi /etc/rc.d/rc.firewall新增複製內容到剪貼板
代碼:
######### filter table #########

# flush chains

iptables -F INPUT

iptables -F FORWARD

iptables -F OUTPUT

# setup policy

iptables -P INPUT ACCEPT

iptables -P FORWARD ACCEPT

iptables -P OUTPUT ACCEPT

#Allow From Cyut Class

iptables -A INPUT -s 163.17.9.0/24 -j ACCEPT

# Allow SSH

iptables -A INPUT -p tcp --sport 22 -j ACCEPT

# Sendmail Services

iptables -A INPUT -p tcp --sport 25 -j ACCEPT

iptables -A INPUT -p tcp --dport 25 -j ACCEPT

# allow DNS

iptables -A INPUT -p tcp --sport 53 -j ACCEPT

iptables -A INPUT -p udp --sport 53 -j ACCEPT

iptables -A INPUT -p tcp --dport 53 -j ACCEPT

iptables -A INPUT -p udp --dport 53 -j ACCEPT

#web server services

iptables -A INPUT -p tcp --sport 80 -j ACCEPT

iptables -A INPUT -p tcp --dport 80 -j ACCEPT

# drop all other connections

iptables -A INPUT -p tcp --syn -j DROP

iptables -A INPUT -p udp -j DROP更改權限並設定開機時自動生效複製內容到剪貼板
代碼:
[root@sample ~]# chmod 700 /etc/rc.d/rc.firewall

[root@sample ~]# vi /etc/rc.d/rc.local新增複製內容到剪貼板
代碼:
/etc/rc.d/rc.firewall建立郵件系統,這部份分為兩個區
安裝postfix、dovecot (如果已經安裝過可以直接跳過這個步驟)複製內容到剪貼板
代碼:
[root@sample ~]# yum -y install postfix dovecot設定postfix 使得 SMTP 功能正常運作
編輯Postfix設定檔複製內容到剪貼板
代碼:
[root@sample ~]# vi /etc/postfix/main.cf修改下面相關設定複製內容到剪貼板
代碼:
 myhostname = mail.ihao.org ←設定主機名稱(自取)

myorigin = $myhostname ← 發信時所顯示的domain

inet_interfaces = all ← 監聽的介面

mydestination = $myhostname, localhost.$mydomain, localhost, ihao.org ← 允許收信的主機名稱

mynetworks = 127.0.0.0/8, 192.168.1.127 ← 信任的網域,設定在這裡的網域可以直接透過postfix寄信重新啟動Postfix,讓設定檔生效複製內容到剪貼板
代碼:
[root@sample ~]# service postfix restart編輯dovecot設定檔讓imap服務能正常運作複製內容到剪貼板
代碼:
[root@sample ~]# vi /etc/dovecot.conf修改下面設定複製內容到剪貼板
代碼:
listen = *

protocols = imap imaps重新啟動dovecot,讓設定檔生效複製內容到剪貼板
代碼:
[root@sample ~]# service dovecot restart讓postfix、dovecot 開機後會自動啟動複製內容到剪貼板
代碼:
[root@sample ~]# chkconfig postfix on

[root@sample ~]# chkconfig dovecot on
備註:
postfix: 一套高效能的郵件伺服器軟體(smtp)
dovecot :前身是sendmail,後來將smtp pop3s pop3 imap imaps 整合在一起後更名為dovecot
安裝php相關套件以符合安裝eGroupware時需要的相關套件複製內容到剪貼板
代碼:
[root@sample ~]# yum -y install php php-mysql php-mbstring php-imap php-gd php-pear cron啟動apache(網頁伺服器)及mysql(資料庫)複製內容到剪貼板
代碼:
[root@sample ~]# echo "127.0.0.1   localhost" > /etc/hosts

[root@sample ~]# echo "163.17.9.171   test.cyut.edu.tw" >> /etc/hosts

[root@sample ~]# service network restart

[root@sample ~]# service mysqld start

[root@sample ~]# service httpd start
讓httpd(apache)、mysqld 開機後會自動啟動複製內容到剪貼板
代碼:
[root@sample ~]# chkconfig httpd on

[root@sample ~]# chkconfig mysqld on
進入egroupware實質安裝步驟
取得 eGruopware source code 並且解壓縮後放置在預設網站資料夾複製內容到剪貼板
代碼:
[root@sample ~]# wget http://jaist.dl.sourceforge.net/sourceforge/egroupware/eGroupWare-1.4.001.zip

[root@sample ~]# unzip eGroupWare-1.4.001.zip

[root@sample ~]# mv egroupware /var/www/html/
開始利用網頁模式進行安裝
這時候請開一個putty連線到您的伺服器上,接下來的設定步驟中仍需要輸入部分指令
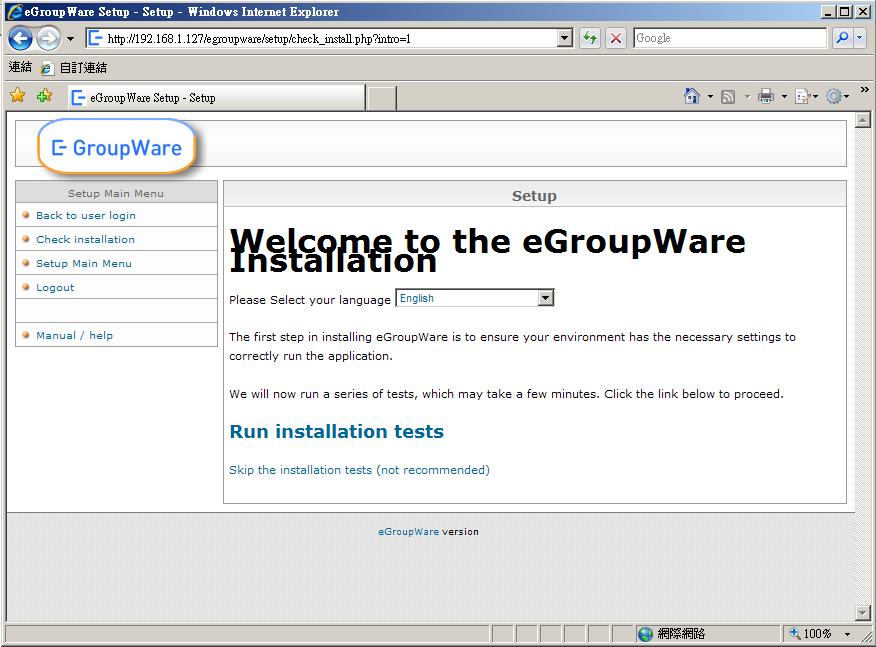
預設是英文安裝介面,由於小弟英文不佳,所以請大家跟著改成繁體中文
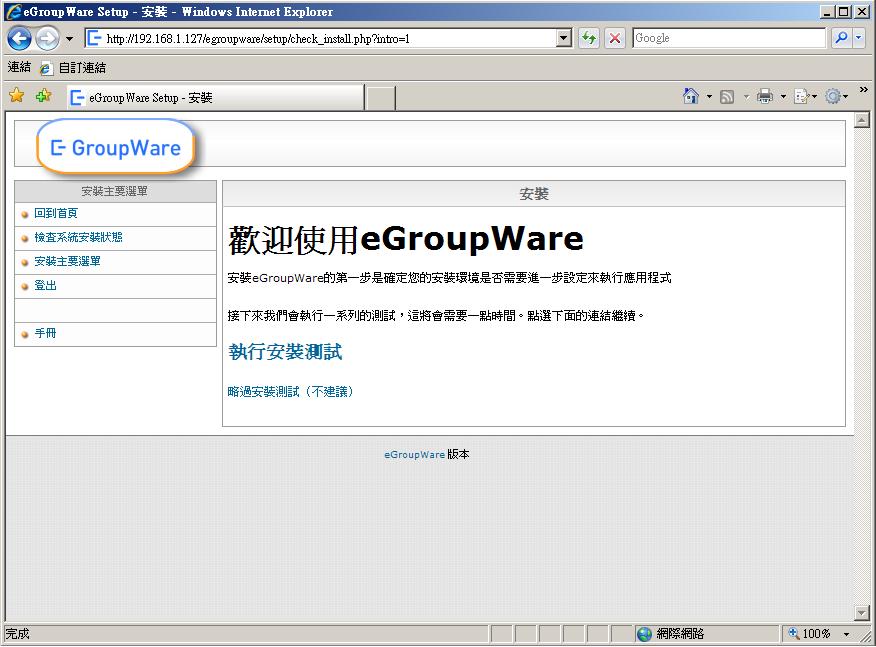
看到中文頁面,壓力瞬間少了很多,開始我們的安裝程序吧
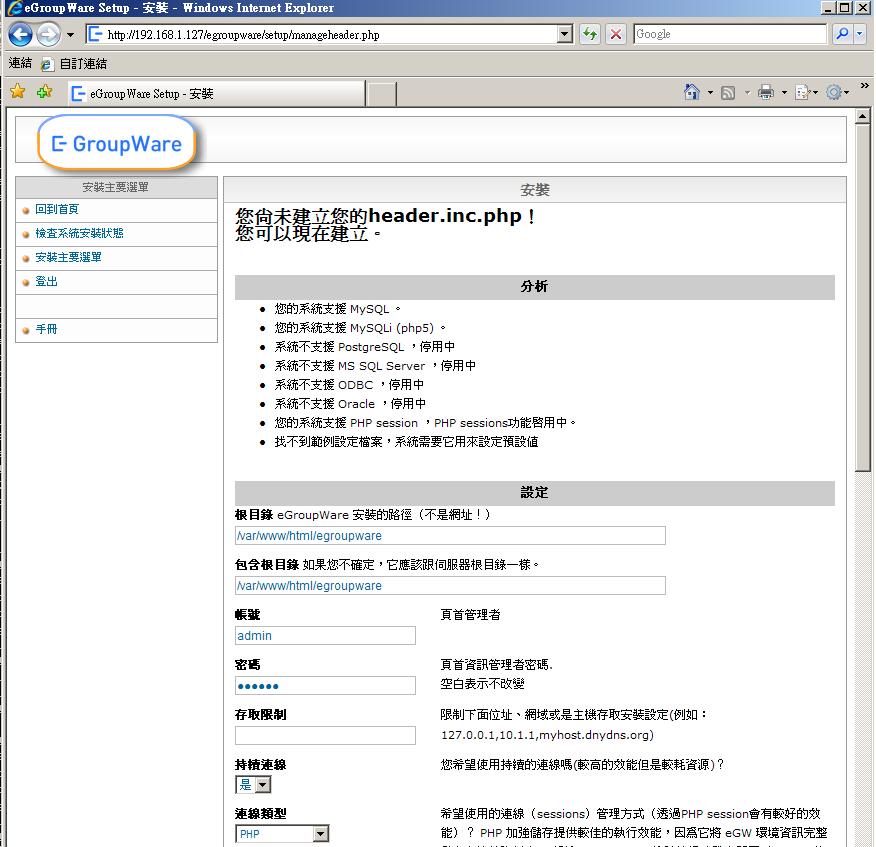
系統環境設定,這部份要更改或設定幾個地方
資料庫種類:
使用 Fedora 6(含)以上版本、RHEL 5 (含)以上版本、CentOS 5 (含)以上版本 請將資料庫種類設為 MySQLi(php5)
其他版本請設為 MySQL
設定資料庫密碼 跟 組態管理密碼,密碼自取,但千萬不要忘記唷
設定好按一下瀏覽
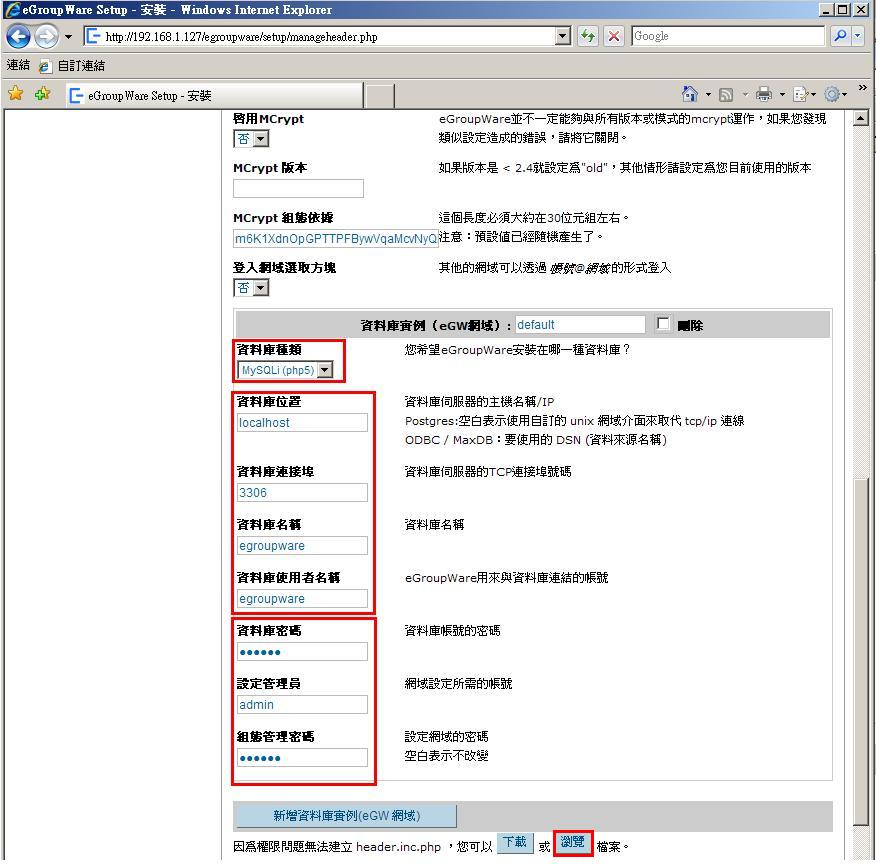
按照指示將中間的存成header.inc.php複製內容到剪貼板
代碼:
[root@sample ~]# vi /var/www/html/egroupware/header.inc.php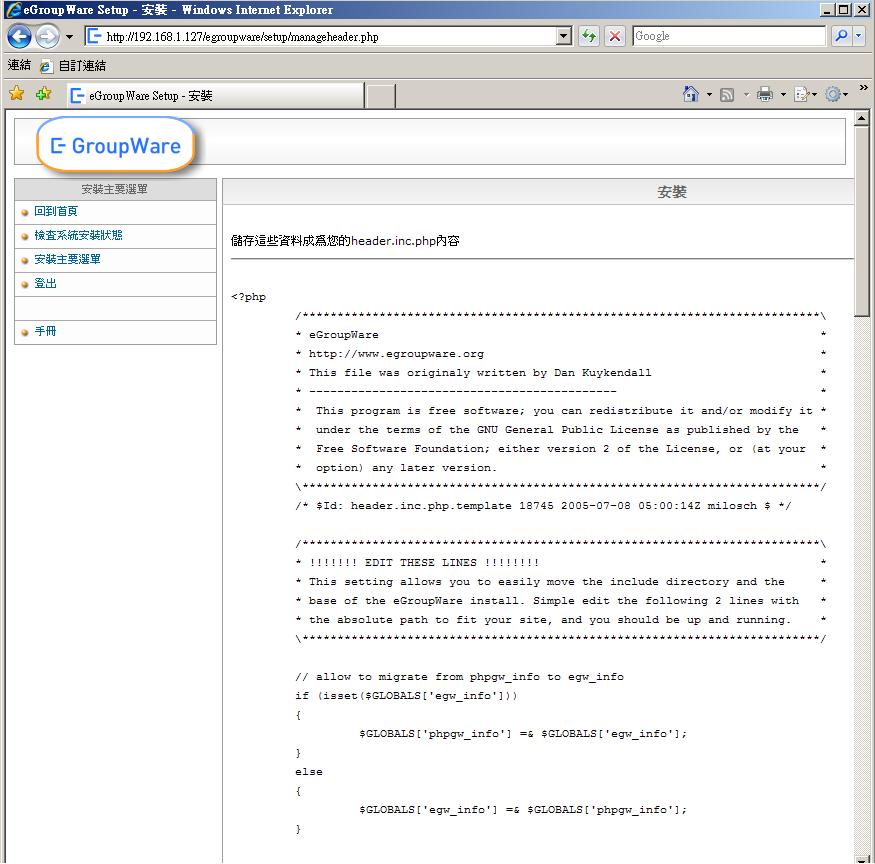 ]
]
輸入安裝管理員密碼,就可以進入系統設定模式
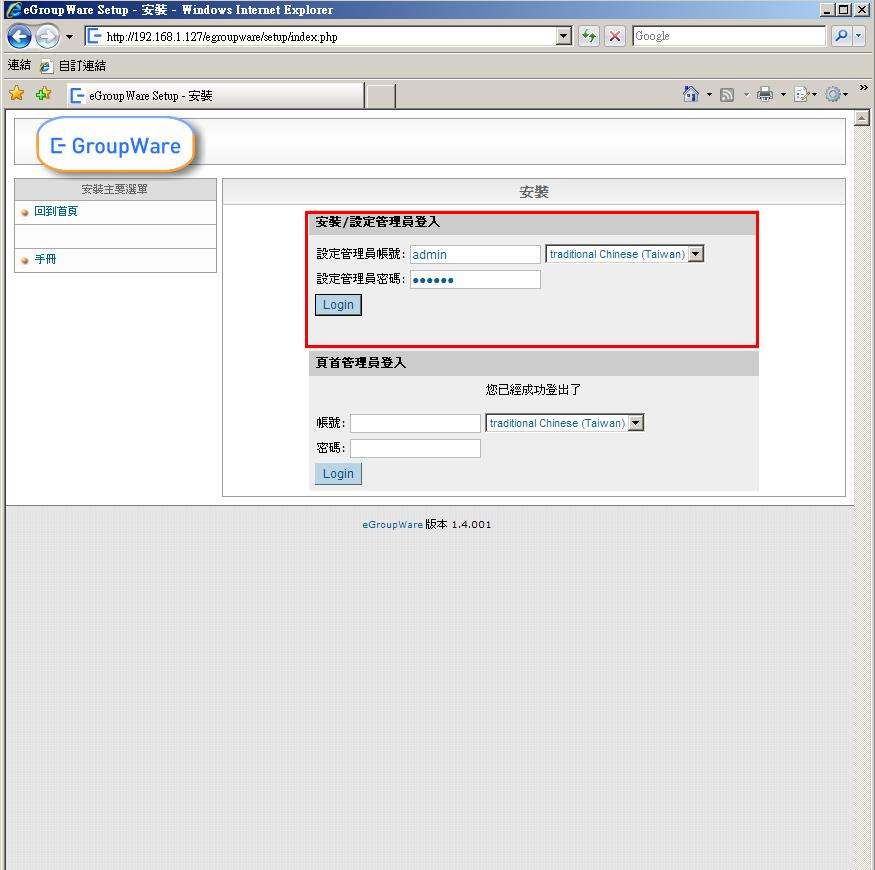
由於先前我們並未建立egroupware這個資料庫,所以我們必須要按照指示先建立資料庫複製內容到剪貼板
代碼:
[root@sample ~]# mysql -u root -p

mysql> CREATE DATABASE egroupware;

mysql> GRANT ALL ON egroupware.* to egroupware@localhost INENTIFIED BY '681121';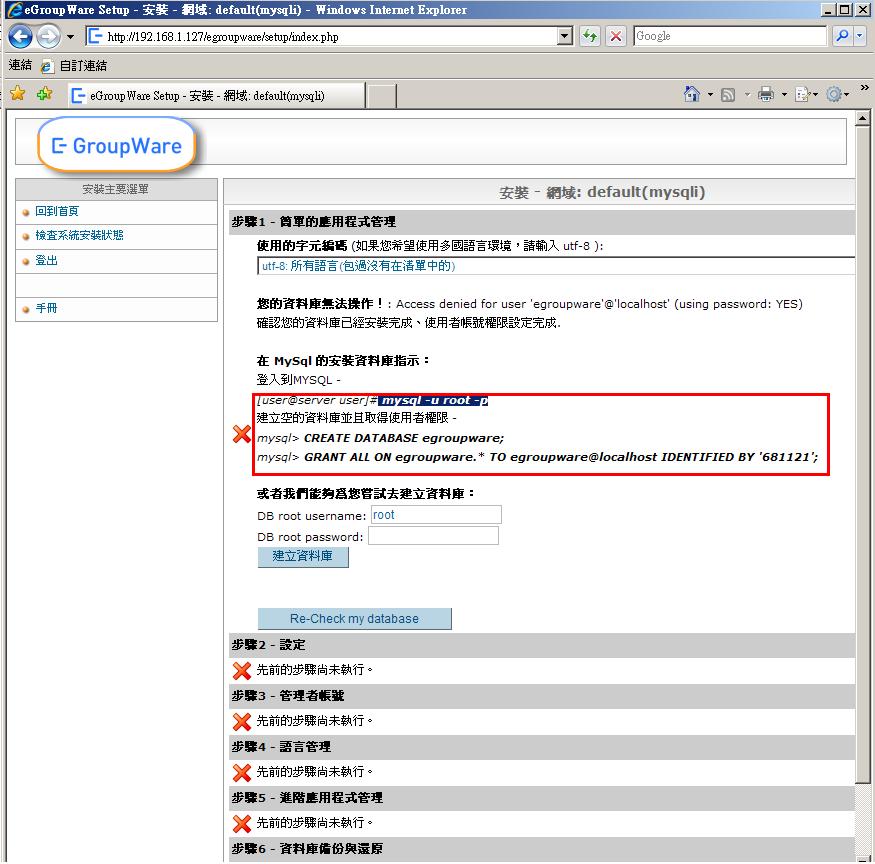
安裝所有應用程式,按一下安裝就會開始部署應用程式
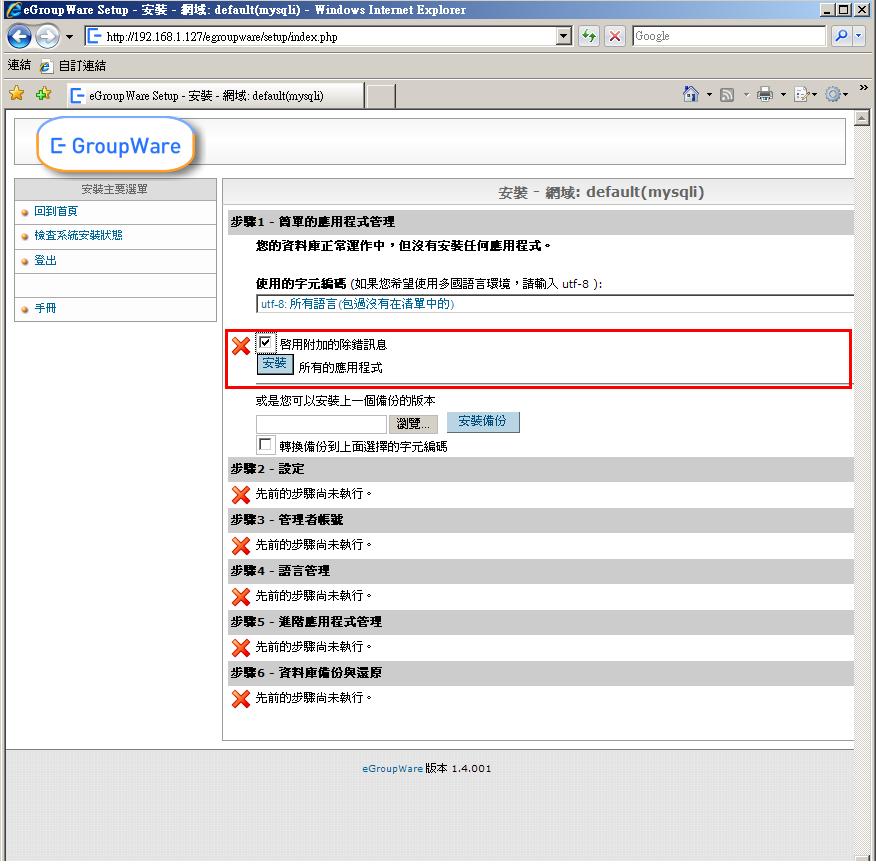
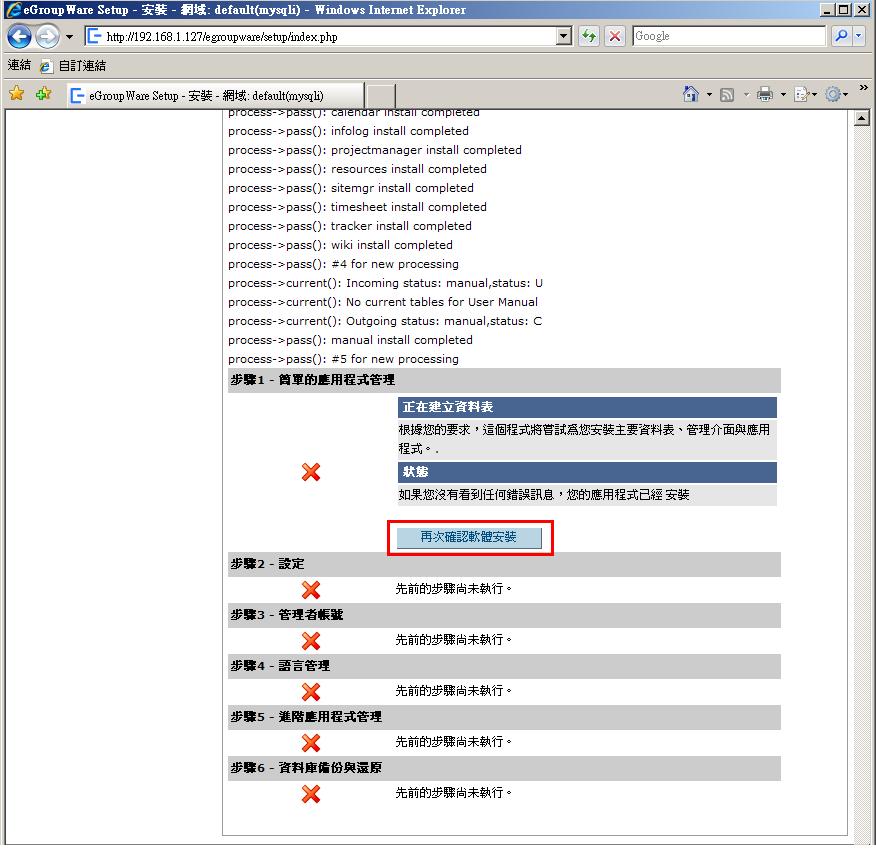
按一下再次確認安裝軟體,讓畫面回到安裝頁面中
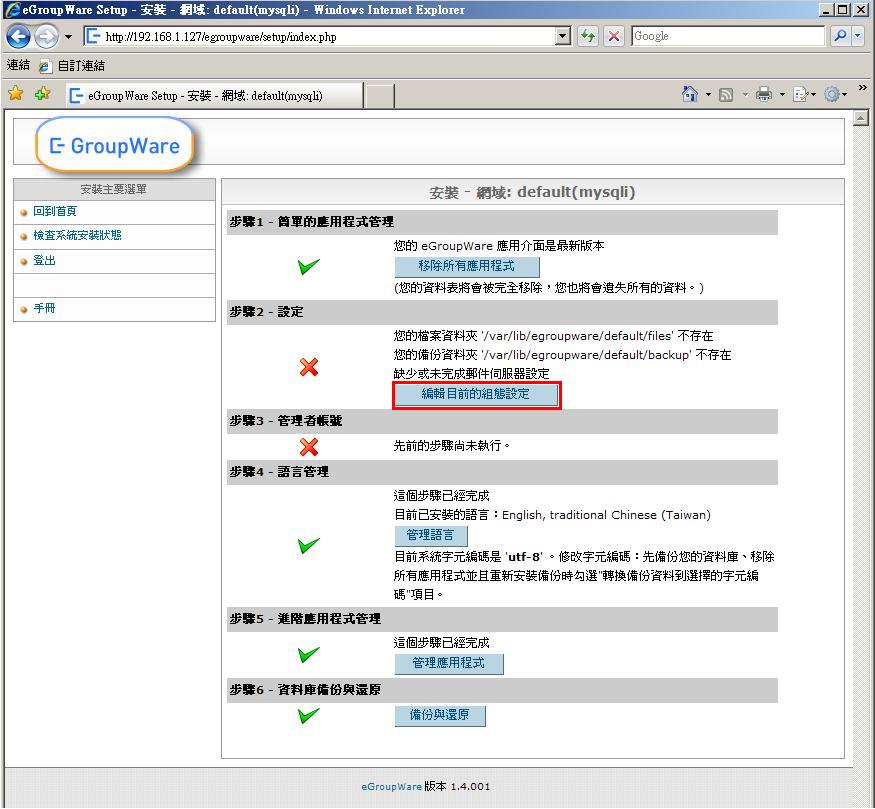
編輯目前的組態設定,在這裡可以發現系統警告找不到檔案資料夾及備份資料夾,所以我們必須新增一下這兩個資料夾複製內容到剪貼板
代碼:
[root@sample ~]# mkdir -m 777 -p /var/lib/egroupware/default/files

[root@sample ~]# mkdir -m 777 -p /var/lib/egroupware/default/backup
新增完後按一下編輯目前的組態設定
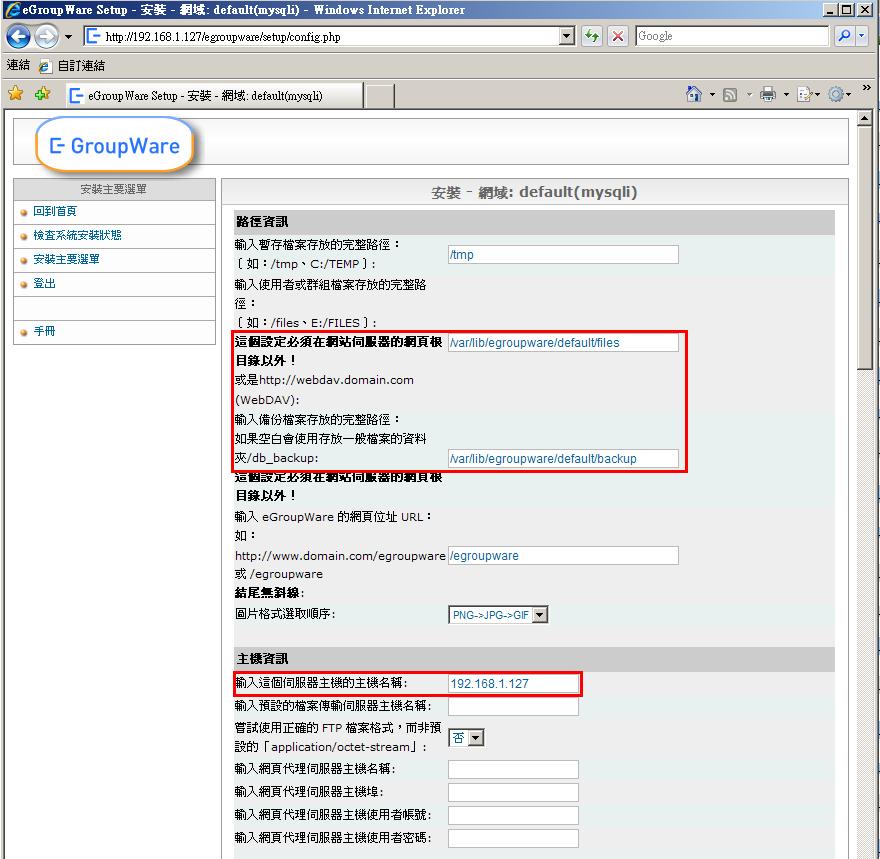
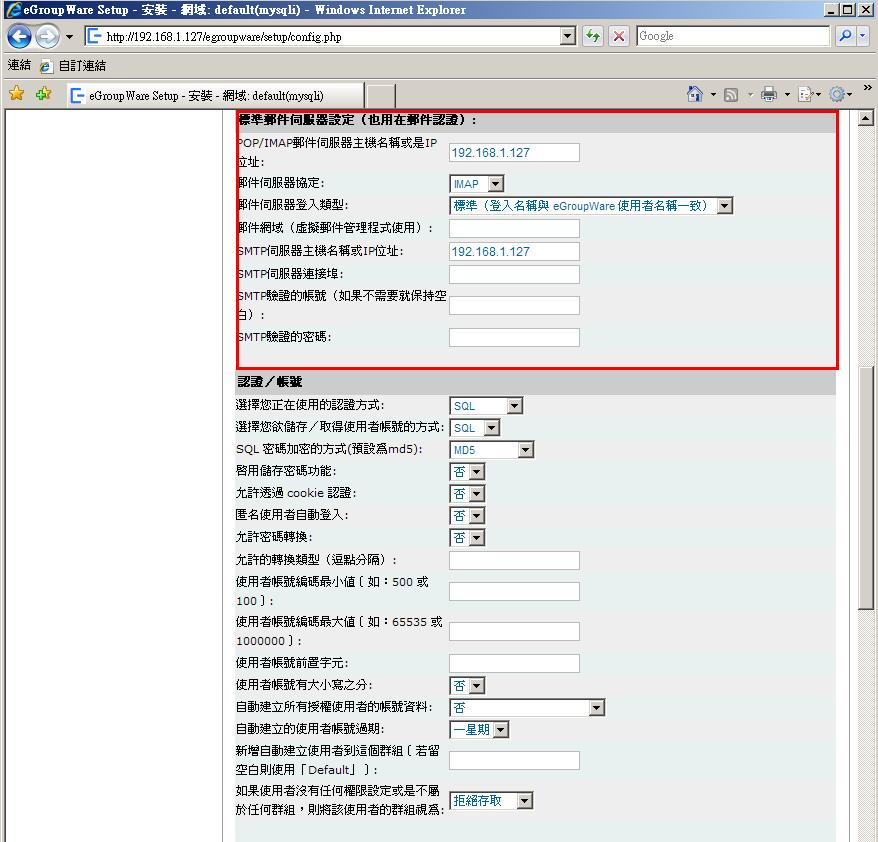
在這個地方我們需要確認一下紅色框框的地方,其中需要特別注意的是
POP/IMAP、SMTP 等伺服器設定要記得填上去伺服器的IP位址
[
建立管理者帳號
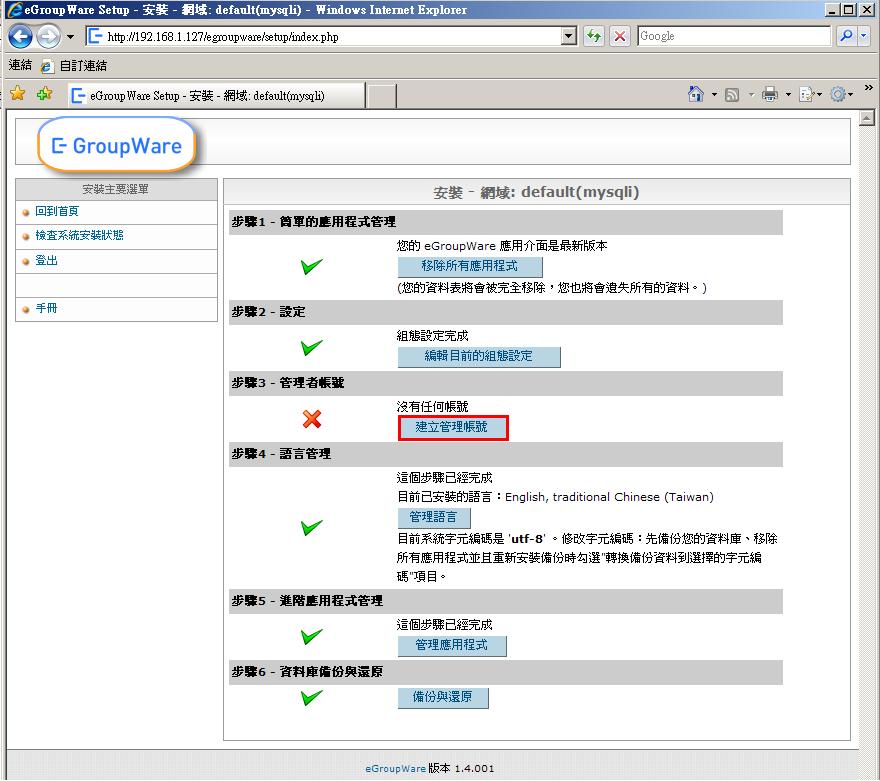
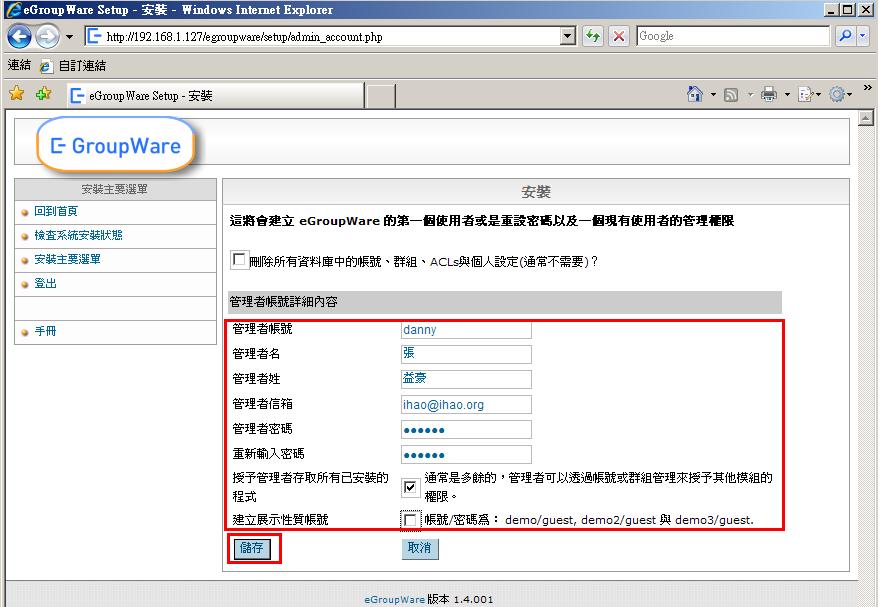
填入你想要建立的帳號資訊
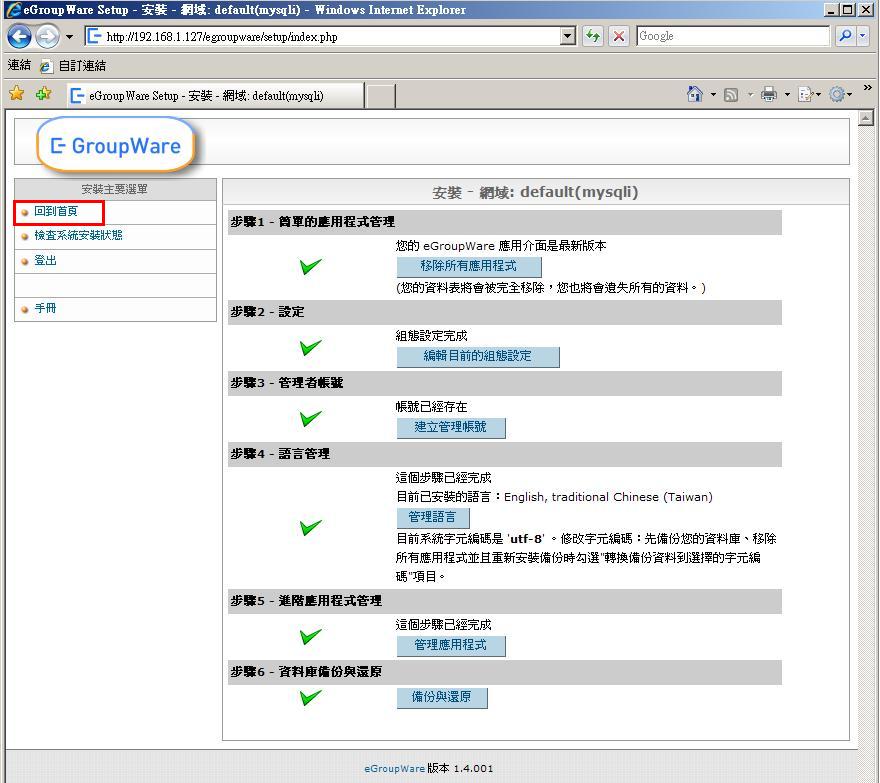
如果都沒問題應該會出現下面頁面,告訴您完成所有應該進行的安裝步驟
按一下回到首頁
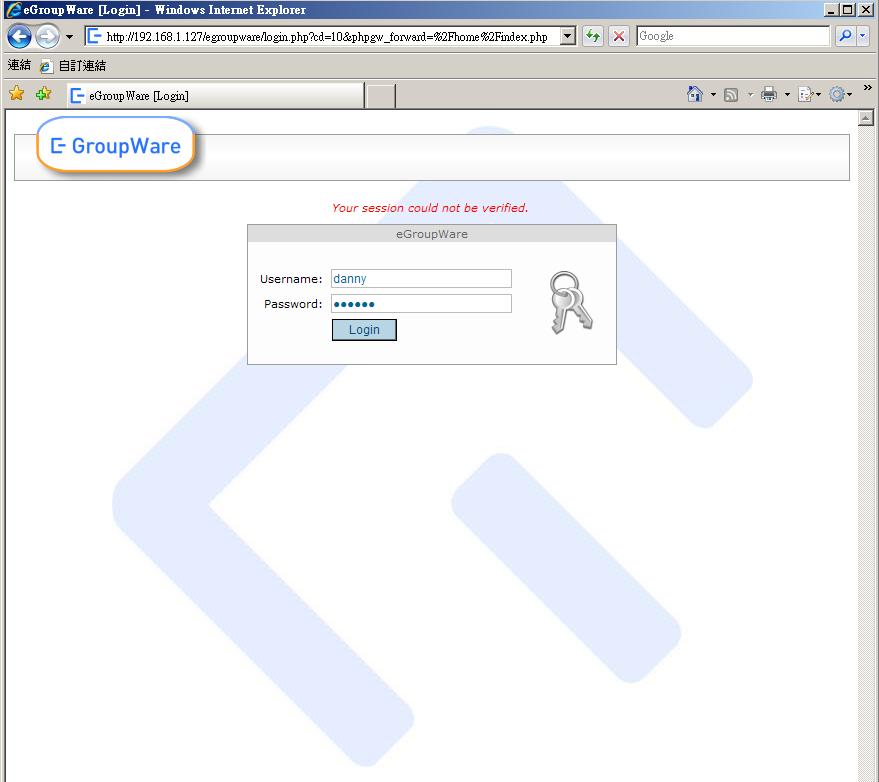
恭喜您可以開始使用eGroupware 的服務了
作者: flyingduan 時間: 2008-3-29 10:09 標題: 字体更改
你好,看了您關于egroupware安裝的文章,我自己也做了一下。但是我這邊在“目前系統字元編碼是 'utf-8' ”的設置和你有點不同,導緻我在后麵的設置用戶語言的時候,齣現的都是“??……”,我選擇的是“iso-8895-1”的編碼,我想更改成utf-8該如何更改?
謝謝
| 歡迎光臨 ihao論壇 (https://ihao.org/dz5/) |
Powered by Discuz! 6.0.0 |
